When you have multiple containers with microservices interacting with each other, you’ll need a way to manage these containers. Common tools for container orchestration are Docker Swarm and Kubernetes. We’ll be dealing with Kubernetes since public cloud providers recently introduced Kubernetes cluster management systems. For example, Amazon has Elastic Kubernetes Services (EKS), Microsoft has Azure Kubernetes (AKS), and Google Cloud Platform has Google Kubernetes Engine (GKE).
Summary
- Enable Hyper-V and create a virtual switch
- Add
kubectl.exeto PATH environment variable - Add
minikube.exeto PATH environment variable - Add
helm.exeto PATH environment variable - Download ZIP and extract Pixie Lab Materials
- Get PowerShell equivalent of Bash script in repository above
- Continue with tutorial
Kubernetes
Download the command line tool kubectl.exe from https://dl.k8s.io/release/v1.22.0/bin/windows/amd64/kubectl.exe
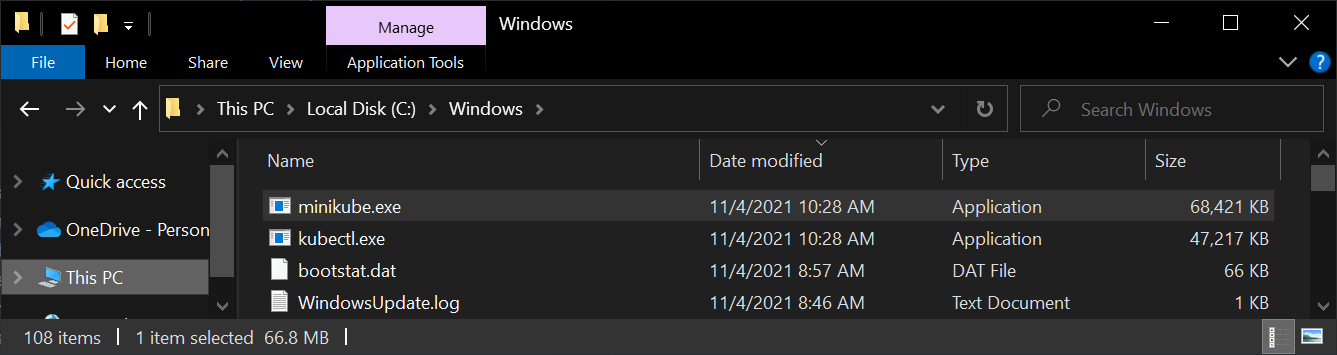
To avoid setting up PATH environment variables, you can copy kubectl.exe to C:\Windows\. Then, open a command prompt as an Administrator to make sure it works by entering: kubectl version
To continue, kubectl.exe needs to be configured with a Kubernetes cluster, and the configuration for this is found here: C:\Users\%username%\.kube\config
Currently, Kubernetes clusters cannot be created natively in Windows. However, starting with Windows Server 2019 and Windows 10 version 1903, you can natively run containers based on a Windows Server 2019 image.
In this case, we’ll be configuring kubectl.exe with the minikube.exe cluster, a Linux virtual machine with a single node primarily used for development and testing. You can also configure kubectl.exe to work with an AWS cluster on EKS or AKS cluster in Azure. The key here is to modify the config file accordingly (or enter the command line to modify it accordingly).

Minikube
Download Minikube from https://github.com/kubernetes/minikube/releases/latest/download/minikube-windows-amd64.exe and rename the executable from minikube-windows-amd64.exe to minikube.exe then copy it to C:\Windows\ to avoid adding Environment Variables.
Minikube is a Linux virtual machine with a Kubernetes cluster pre-configured. To continue, you’ll need to have Oracle VirtualBox installed (Windows 7) or Hyper-V (Windows 8 Pro and above). We’ll be running Minikube in Hyper-V to avoid installer another piece of software.
Helm
Helm is a command line tool that makes deployments to kubernetes clusters very simple. Download Helm from https://get.helm.sh/helm-v3.7.1-windows-amd64.zip and extract helm.exe to C:/Windows/ to avoid messing with Envrionment Variables.
Basically, Helm is used to read YAML (YAML Ain’t Markup Language) files that contains configurations for Kubernetes deployments, such as persistent volumes, pods, and more. Get started by making sure Helm works: helm version.
Hyper-V
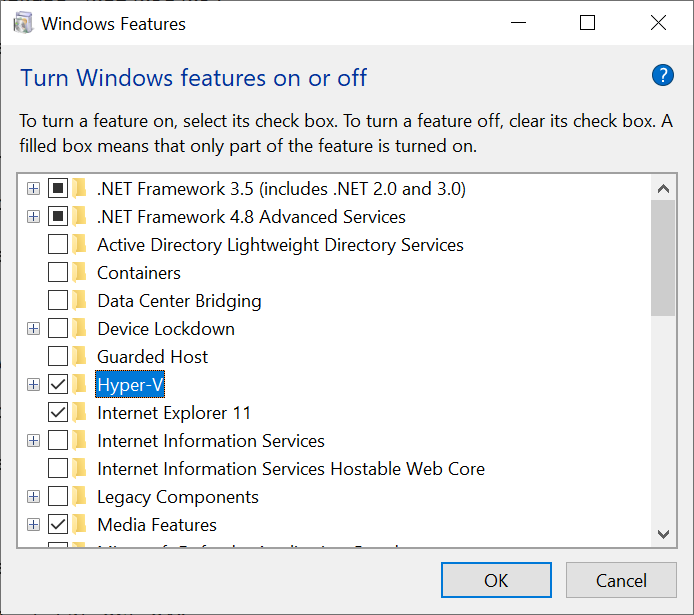
Install Hyper-V by going to the Control Panel > Programs and Features. On the left pane, click on Turn Windows features on or off. Select everything under Hyper-V and click OK.
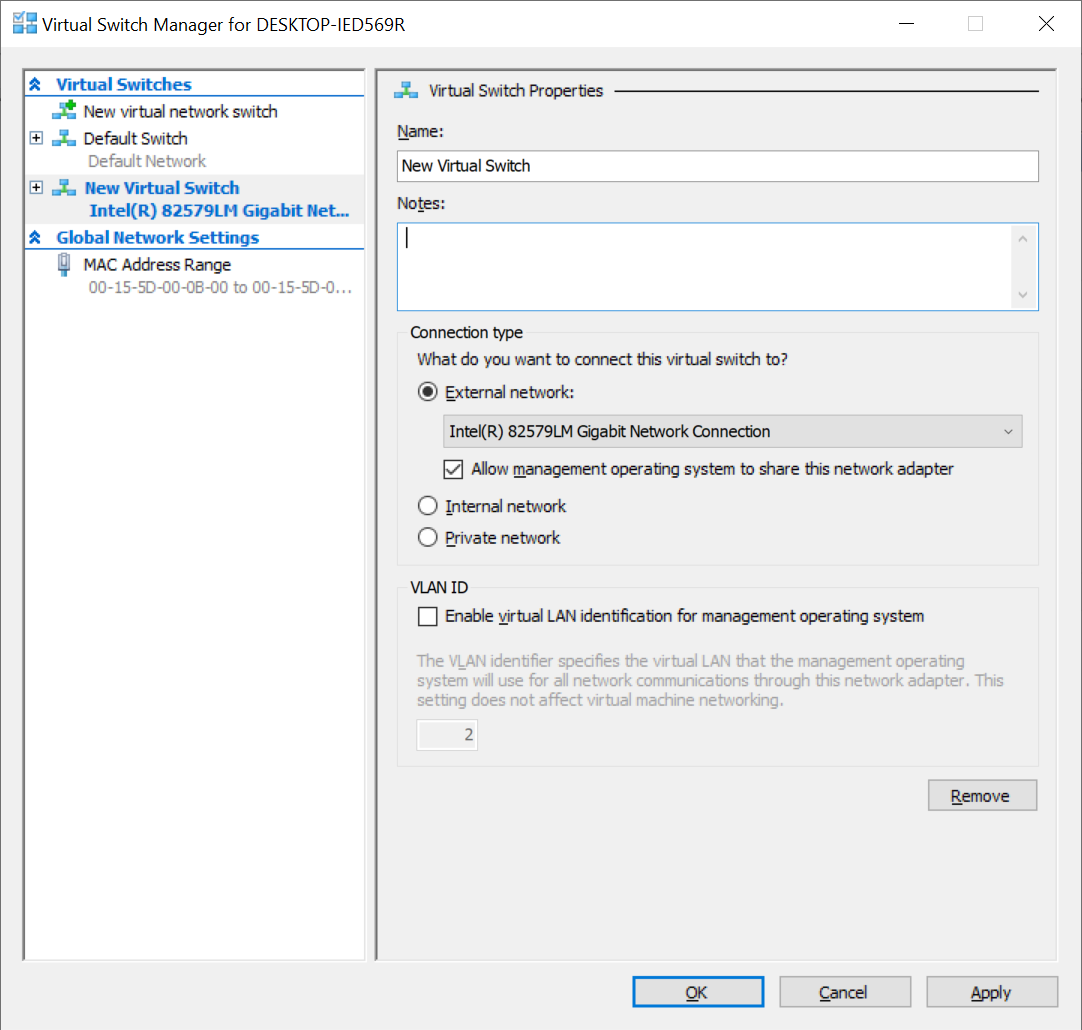
Once Hyper-V is installed, open the Hyper-V Manager (Start > All Apps > Windows Administrative Tools > Hyper-V Manager) and click on Virtual Switch Manager.
Create a new virtual network switch and set it to External network. In this case, the name of our switch is called New Virtual Switch. Note: The default switch is internal and will have issues pulling images.
Configure Kubectl with Minikube via Hyper-V
Since we want to work with Hyper-V, we’ll need to set the driver to hyperv and set the hyperv-virtual-switch to New Virtual Switch that we created in the previous step. The following command will set your default vm-driver and hyperv-virtual-switch:
minikube config set driver hyperv && minikube config set hyperv-virtual-switch "New Virtual Switch"
Next, clone the repository and follow the tutorial on https://developer.newrelic.com/collect-data/pixie/
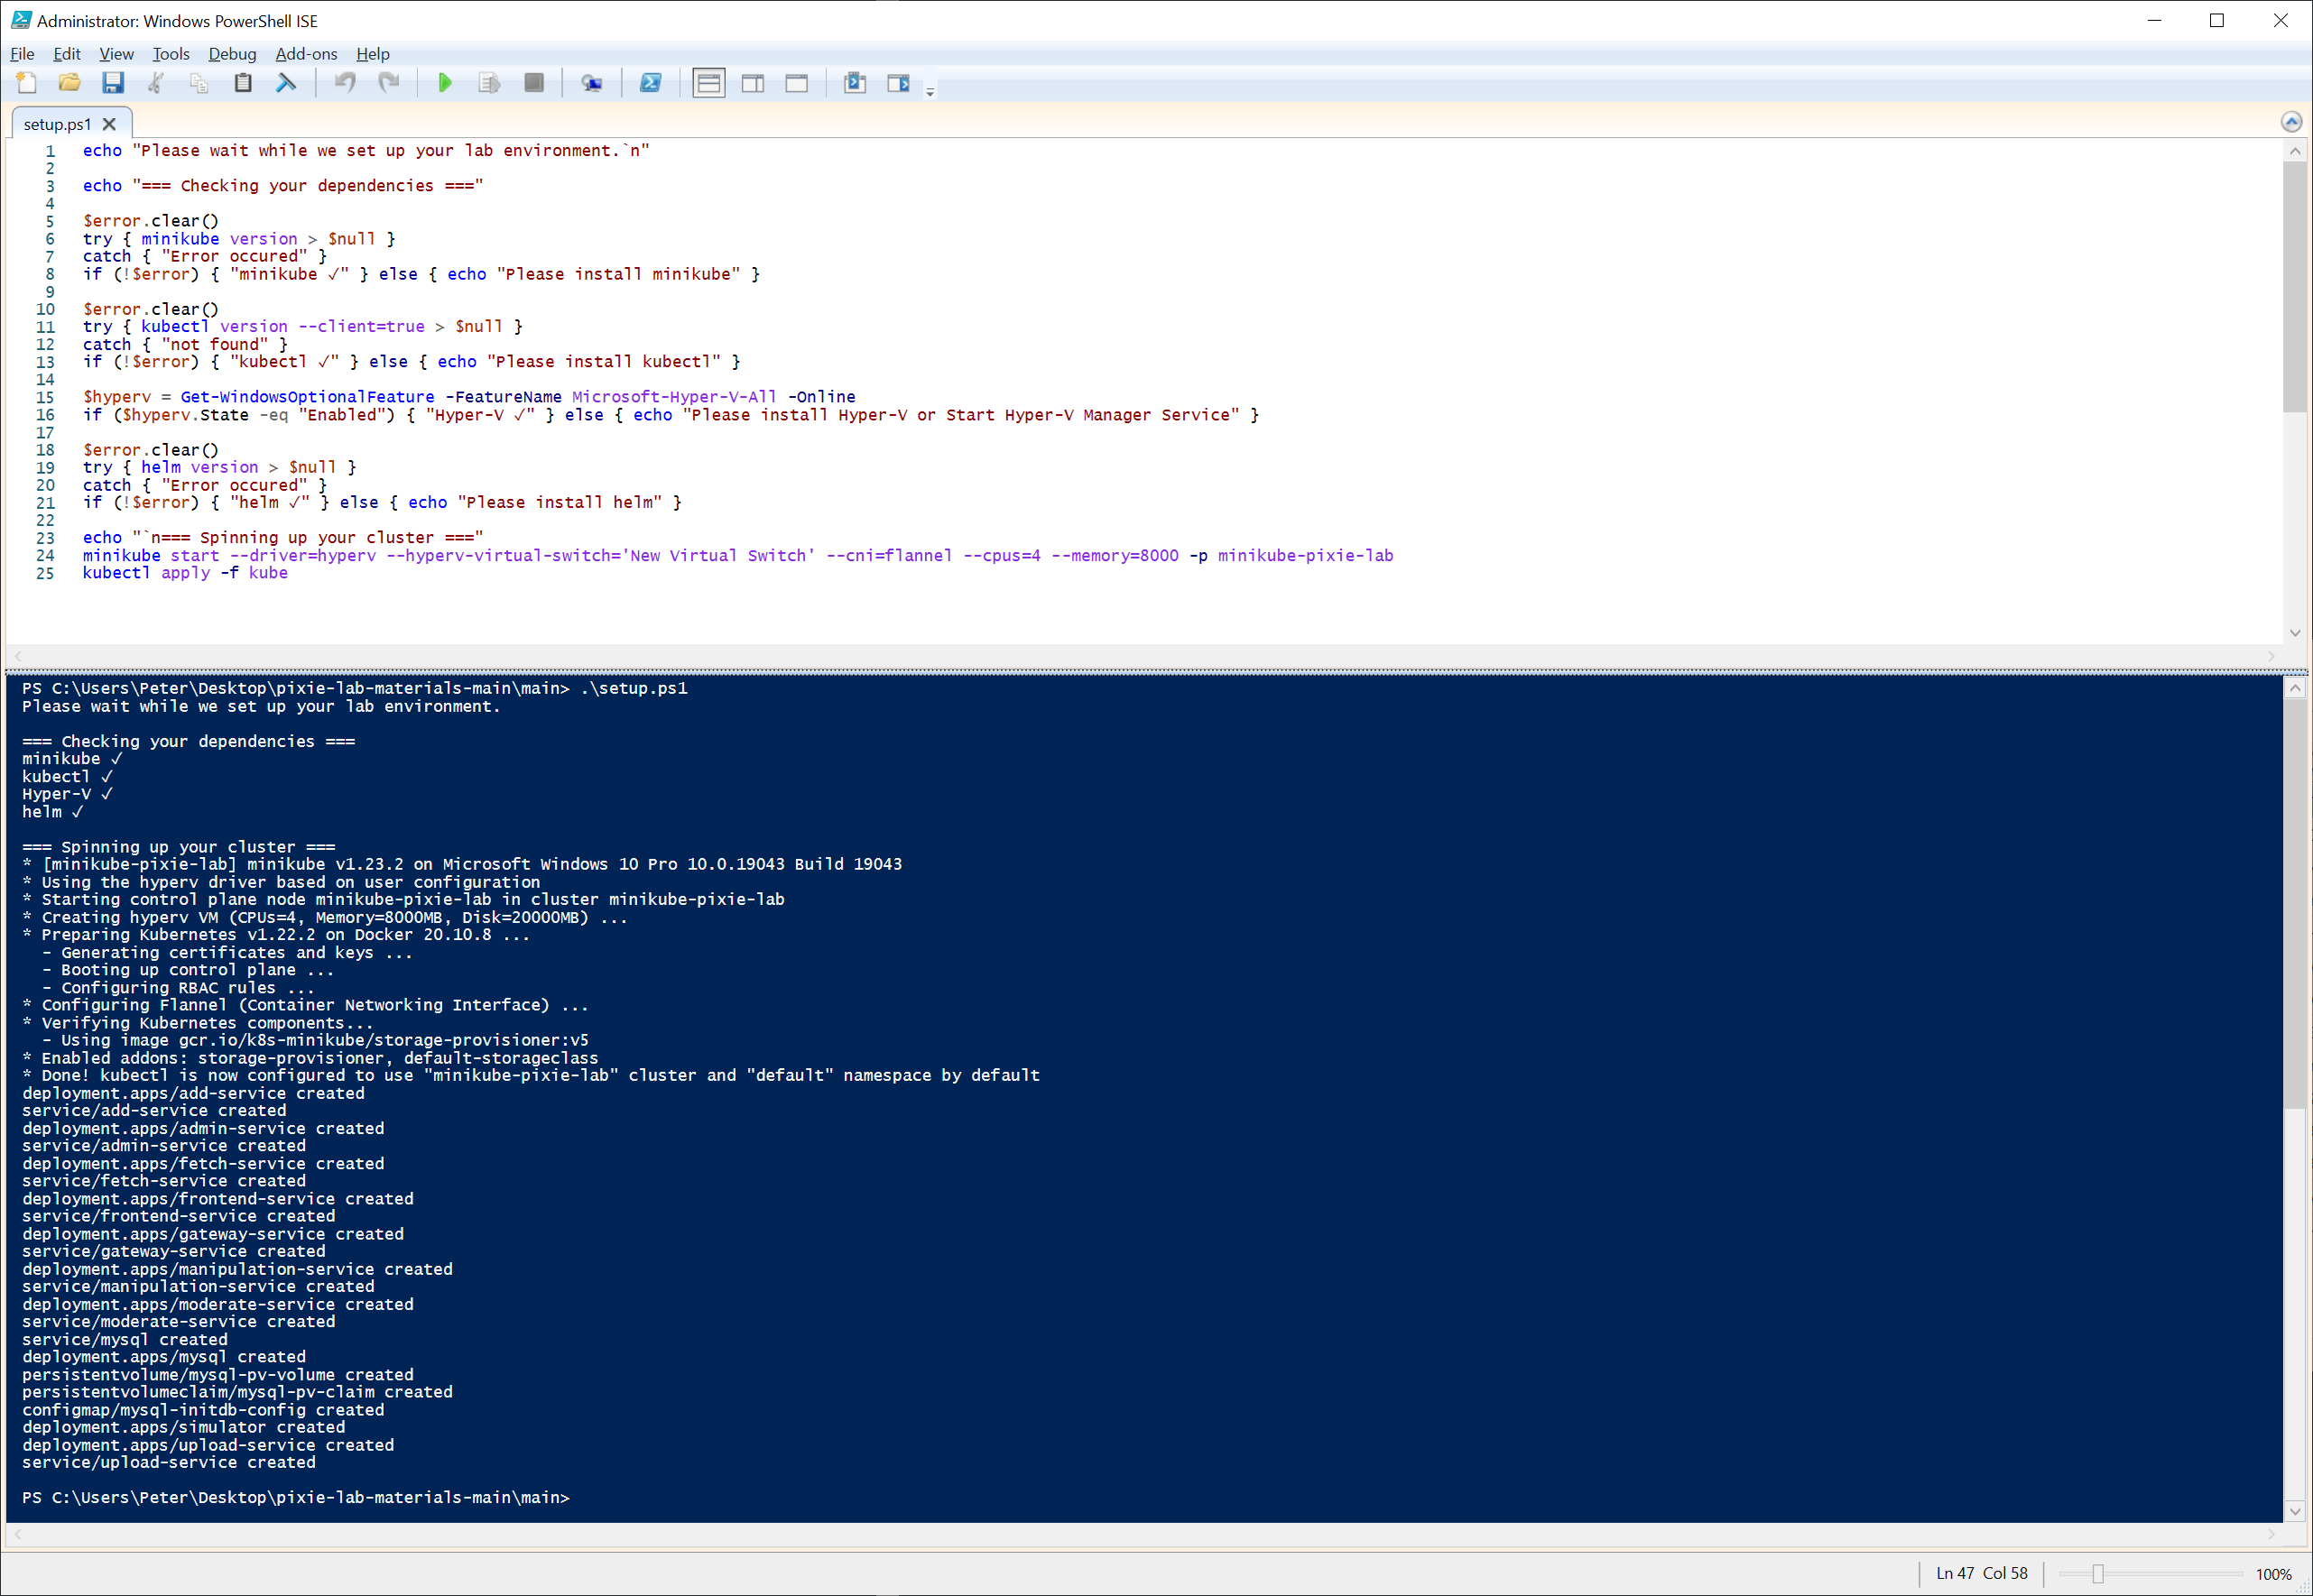
main/setup.ps1
echo "Please wait while we set up your lab environment.`n"

echo "=== Checking your dependencies ==="

$error.clear()
try { minikube version > $null }
catch { "Error occured" }
if (!$error) { "minikube ✓" } else { echo "Please install minikube" }

$error.clear()
try { kubectl version --client=true > $null }
catch { "not found" }
if (!$error) { "kubectl ✓" } else { echo "Please install kubectl" }

$hyperv = Get-WindowsOptionalFeature -FeatureName Microsoft-Hyper-V-All -Online
if ($hyperv.State -eq "Enabled") { "Hyper-V ✓" } else { echo "Please install Hyper-V or Start Hyper-V Manager Service" }

if ((Get-VMSwitch | findstr -i external) -eq $null) { "Please create an External Hyper-V Switch" } else { echo "Hyper-V External Switch ✓" }

$error.clear()
try { helm version > $null }
catch { "Error occured" }
if (!$error) { "helm ✓" } else { echo "Please install helm" }

echo "`n=== Spinning up your cluster ==="

# 8000 MB memory is not enough on Windows and 4 CPUs runs a bit slow
minikube start --driver=hyperv --hyperv-virtual-switch='New Virtual Switch' --cni=flannel --cpus=6 --memory=10000 -p minikube-pixie-lab
kubectl apply -f kube
To make sure kubectl is configured to use the Minikube cluster, enter kubectl cluster-info
You can also enter kubectl get nodes to see your nodes.
Note: Minikube clusters are preconfigured to have 1 node, while many production-ready environments recommend having 3 nodes.
New Relic Pixie Tutorial
After your minikube cluster is up and running, you’ll be directed to install Pixie by going through the guided install. However, the script that is generated was meant for bash terminals. To correct this script for PowerShell, replace && with ; to execute another statement, and replace \ with ` (backtick) to continue statements on the next line. A sample of what this would look like for PowerShell:
kubectl apply -f https://download.newrelic.com/install/kubernetes/pixie/latest/px.dev_viziers.yaml;
kubectl apply -f https://download.newrelic.com/install/kubernetes/pixie/latest/olm_crd.yaml;
helm repo add newrelic https://helm-charts.newrelic.com;
helm repo update;
kubectl create namespace newrelic;

helm upgrade --install newrelic-bundle newrelic/nri-bundle `
 --set global.licenseKey=a1b2c3d4e5f6g7h8i9j0k1l2m3n4o5p6q7r8NRAL `
 --set global.cluster=tiny-hat `
 --namespace=newrelic `
 --set newrelic-infrastructure.privileged=true `
 --set global.lowDataMode=true `
 --set ksm.enabled=true `
 --set prometheus.enabled=true `
 --set kubeEvents.enabled=true `
 --set logging.enabled=true `
 --set newrelic-pixie.enabled=true `
 --set newrelic-pixie.apiKey=px-api-a1b2c3d4-e5f6-g7h8-i9j0-k1l2m3n4o0p5 `
 --set pixie-chart.enabled=true `
 --set pixie-chart.deployKey=px-dep-d4c3b2a1-f6e5-h8g7-j0i9-p5o0n4m3l2k1 `
 --set pixie-chart.clusterName=tiny-hat
scenario-1/setup.ps1
echo "Please wait while we set up your lab environment.`n"

kubectl apply -f kube

$pod=kubectl get pods -o custom-columns=":metadata.name" | findstr mysql
$query="mysql --database=main --password=password --execute=\""insert into images values (101, 'pixie', 'https://tinyhats.s3.amazonaws.com/pixie.png', 'pixie.png', 'PIXIE', 'true');"""
kubectl exec -it $pod -- bash -c $query > $null
echo "Done!"
scenario-2/setup.ps1
echo "Please wait while we set up your lab environment.`n"

$pod=kubectl get pods -o custom-columns=":metadata.name" | findstr mysql

$query="mysql --database=main --password=password --execute=\""UPDATE images SET approve = 'false' WHERE id = 101;"""
kubectl exec -it $pod -- bash -c $query > $null
kubectl apply -f kube

echo "Done!"
Conclusion
Follow the rest of the lab tutorial here: https://developer.newrelic.com/collect-data/pixie/